


Introduction
After you hosted your source code for an (lets say) ASP.NET 6 Core API you want to deploy this stuff to Azure. Because you like it to happen automatically you decide to use a Github Action. If you now follow the documentation it leads you to use a publish profile for this. Basically all sources on the internet suggest to use the step azure/webapps-deploy@v1 in conjunction with the parameter publish-profile. So the steps would be:
- Create an app service in Azure.
- Download the publish profile from the portal.
- Upload the publish profile as a secret in your Github project settings.
- Reference the secret from your action yaml.
A lot of problems arise from this IMHO:
- You have to update your GitHub secrets whenever you change the deployment in Azure.
- You use the publish credentials of the App Service instead of the default Azure way (service principal).
- Each app service will use different credentials.
So I’m not saying that this won’t work - all I say is that this is bad style in terms of Azure Governance.
Idea
This article will show a different approach. I’ll show how to create a service principal and use it for the deployment in Github. For demonstrating this I will reference my project auth-logic-trigger. It uses the action defined at auth-logic-trigger.yml.
Create your service principal
First things first. What I want to achieve here is to use a single service principal (SP) for my Github deployments. This SP should then be authorized for specific resources to achieve the correct behavior. So my first step is to create this SP. Again there are a lot of documentations out for creating this SP for RBAC (example). Most of them use Azure CLI and also they are assigning it to a scope directly when creating it. I don’t like this approach. I will do it using the Powershell Az module first. Lets do things step by step.
Set-AzContext -Tenant TENANTID
$principal = New-AzAdServicePrincipal -DisplayName 'My TEST'
$principal | Format-List
If you run this script (or all lines one by one). You should get something like this I dont’ show the complete output):
AccountEnabled : True
AddIn : {}
AlternativeName : {}
AppDescription :
AppDisplayName : My TEST
AppId : 868cab9e-2c39-4651-929f-06777cc3f952
AppOwnerOrganizationId : 18ca94d4-b294-485e-b973-27ef77addb3e
AppRole : {}
AppRoleAssignedTo :
AppRoleAssignment :
AppRoleAssignmentRequired : False
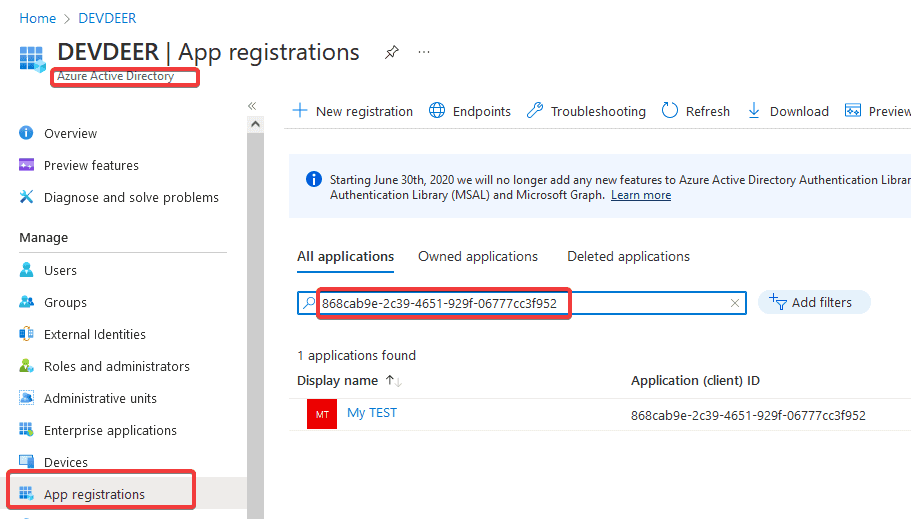
...If you look now into your Azure Portal and search for the AppId in your App Registrations under Azure Active Directory you should see the new service principal:
Interestingly enough the command from Listing 1 also created a password which is valid for one year by default. You can view the password afterwards:
$principal.PasswordCredentials.SecretTextStore the password in Azure KeyVault
Knowing this leads us to the step where we will store this password in a secure location. When you use Azure you should have created an Azure KeyVault for situations like this. In my case my central KeyVault is named akv-devdeer. With this command I create a new secret value in it where the key is something matching my naming rules:
$secretKey = "sp-$($principal.AppId)"
$secret = ConvertTo-SecureString $principal.PasswordCredentials.SecretText -AsPlainText
Set-AzKeyVaultSecret -VaultName akv-devdeer -Name $secretKey  -SecretValue $secret
The result of this operation should be something like this:
Vault Name   : akv-devdeer
Name         : sp-868cab9e-2c39-4651-929f-06777cc3f952
Version      : b6ed29e1fb634dd48f73522c5d58985d
Id           : https://akv-devdeer.vault.azure.net:443/secrets/sp-868cab9e-2c39-4651-929f-06777cc3f952/b6ed29e1fb634dd48f73522c5d58985d
Enabled      : True
Expires      :
Not Before   :
Created      : 17.04.2022 13:46:52
Updated      : 17.04.2022 13:46:52
Content Type :
Tags         :
I’m doing this because this step for 2 reasons. First it is simply the safest place to store the current credentials (even safer than my local drive!). Second I can access the password at any time which gets handy pretty soon.
Create the Credentials for GitHub
Github has a way to store SP information for Azure securely. For this we will generate a script which creates this format for us:
$tenantId = "YOUR TENANT ID"
$subscriptionId = "YOUR SUBSCRIPTION ID"
$secretKey = "THE KEY"
$secret = Get-AzKeyVaultSecret -VaultName akv-devdeer -Name $secretKey -AsPlainText
@{
	clientId = $principal.AppId
	clientSecret = $secret
  	subscriptionId = $subscriptionId
    tenantId = $tenantId
   	activeDirectoryEndpointUrl = "https://login.microsoftonline.com"
    resourceManagerEndpointUrl = "https://management.azure.com/"
    activeDirectoryGraphResourceId = "https://graph.windows.net/"
    sqlManagementEndpointUrl = "https://management.core.windows.net:8443/"
    galleryEndpointUrl = "https://gallery.azure.com/"
    managementEndpointUrl = "https://management.core.windows.net/"
} | ConvertTo-Json
This should output something like this:
{
  "activeDirectoryEndpointUrl": "https://login.microsoftonline.com",
  "activeDirectoryGraphResourceId": "https://graph.windows.net/",
  "sqlManagementEndpointUrl": "https://management.core.windows.net:8443/",
  "galleryEndpointUrl": "https://gallery.azure.com/",
  "resourceManagerEndpointUrl": "https://management.azure.com/",
  "tenantId": "YOUR_TENANT_ID",
  "clientId": "868cab9e-2c39-4651-929f-06777cc3f952",
  "clientSecret": "YOUR_PASSWORD_FROM_KEYVAULT",
  "subscriptionId": "YOUR_SUBSCRIPTION_ID",
  "managementEndpointUrl": "https://management.core.windows.net/"
}
It should be clear that you have to insert your Tenant ID which you can get with
Get-AzContext | Select -Property TenantThe subscription ID is now depending on the Azure subscription where you want your App Service later be deployed to. Because we are generating this Github secret in advance you have to make up your mind now or simply replace the correct subscription ID when you later discover that you did it wrong.
Store the secret in Github
You can simple copy and paste the generated secret now into your Github secrets. Navigate to your project in Github select Settings in the top menu and then Secrets. Finally click on Actions and then Create repository secret on the top right. The default secret name for Azure credentials in Github is AZURE_CREDENTIALS (secrets and environment vars are usually written in upper case). So the following screenshot shows the settings:
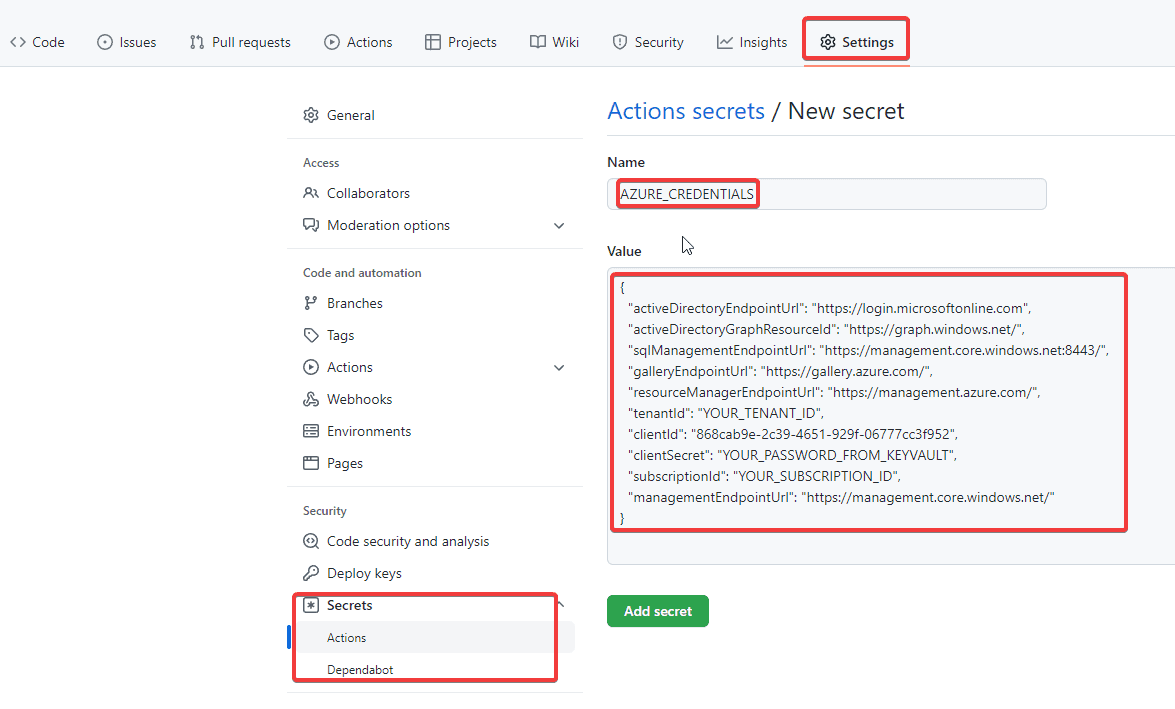
After you clicked on Add secret it is stored in your repo and accessible from your actions.
If you need to update the secret later (because your password expired for instance) you can do this at any time in the secrets-list:

Deploy resources to Azure
Now it is time to create your Azure resources. If you follow my blog and Youtube Channel you know that I’m a huge fan of Bicep when it comes to deployments. My sample repository also contains templates for the App Service. After I excecute my Deploy script I get the following Azure resource group:
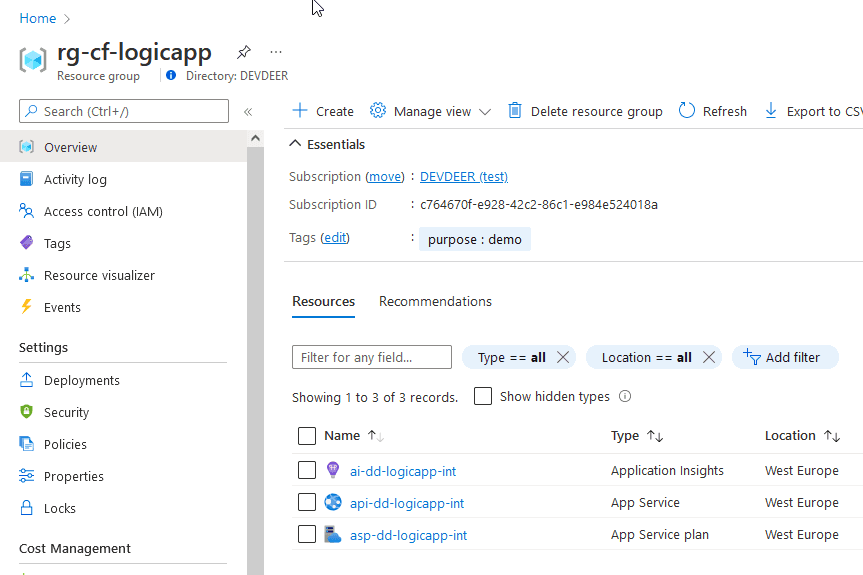
The most important thing here is the resource group itself and the fact that it contains an App Service.
Authorize the Service Principal
Now that we have created the service principal and the resources we want it to be able to access we need to tell Azure our intention. In other words: The service principal needs authorization to the resources in Azure. The easiest way to achieve this is to give it contributor role assignment to the resource group:
$scope = '/subscriptions/c764670f-e928-42c2-86c1-e984e524018a/resourceGroups/rg-cf-logicapp'
New-AzRoleAssignment -ObjectId $principal.Id -Scope $scope -RoleDefinitionName 'Contributor'
The easiest way to retrieve the scope is to click on the JSON view link on the overview blade of the resource group in the Azure Portal:
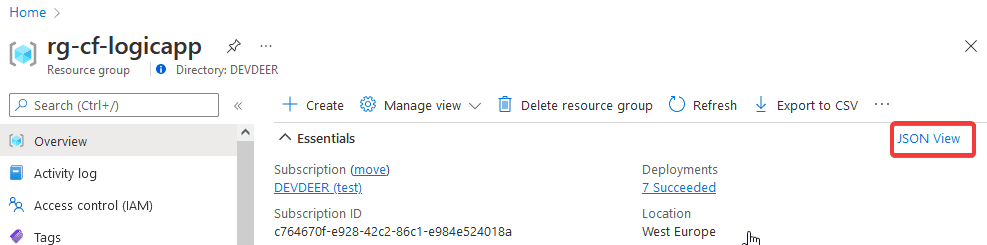
The scope for the role assignment is the content of the Resource id field in the popup.
After executing Listing 6 the service principal will be listed in the Access Control (IAM) blade in the portal telling you that this SP is now authorized as a contributor to the resource group and all subsequent resources.
Recap
So far we prepared everything whats needed to create our CI/CD. Just for an overview:
- We created the service principal.
- We stored its password in our key vault.
- We have a script which will generate the GitHub secret value for us whenever we need it.
- We deployed our Azure resources for the App Service.
- We authorized our service principle to be allowed to manipulate the resources.
Some good optional steps would be to
- Brand the SP in the Azure Portal and give it a description and lets say a logo.
- Generate a single script to summarize all of our tasks in a single PowerShell and store it in our central Azure DevOps or Github or whatever source control we have to centralize our Infrastructure as Code (IaC).
However it is not time to add the final step.
Add a GitHub action
GitHub actions are best saved beside our source code and thus are part of the source control itself. By default GitHub expects them to live inside a .github-folder which has to be placed at the root of our repo. A sample .NET Core 6 action could look like the already mentioned auth-logic-trigger.yml:
name: 'auth-logic-trigger CI/CD'

env:
  SOURCE_PATH: './src/auth-logic-trigger/Service/Service.CoreApi'
  AZURE_WEBAPP_NAME: 'api-dd-logicapp-int'
  AZURE_WEBAPP_PACKAGE_PATH: './auth-logic-trigger/release'
  DOTNET_VERSION: '6.0.202'

on:
  pull_request:
    branches: [ main ]
    paths:
      - './src/auth-logic-trigger/*'
      - './github/workflows/auth-logic-trigger.yml'
  workflow_dispatch:
jobs:
  build:
    runs-on: ubuntu-latest
    steps:
      - uses: actions/checkout@v2
      - name: Setup .NET Core
        uses: actions/setup-dotnet@v1
        with:
          dotnet-version: ${{ env.DOTNET_VERSION }}
      - name: 'Azure CLI login'
        uses: azure/login@v1
        with:
          creds: ${{ secrets.AZURE_CREDENTIALS }}
      - name: Install dependencies
        run: |
          cd ${{ env.SOURCE_PATH }}
          dotnet restore
      - name: Build and Publish
        run: |
          cd ${{ env.SOURCE_PATH }}
          dotnet build --configuration Release --no-restore
          dotnet publish -c Release -o release
      - uses: azure/webapps-deploy@v2
        name: Deploy
        with:
          app-name: ${{ env.AZURE_WEBAPP_NAME }}
          package: '${{ env.SOURCE_PATH }}/release'
The essential part here is the step named Azure CLI login. As you can see it uses the AZURE_CREDENTIALS secret we created earlier to authorize the complete CI/CD session using our service principal (the JSON we have generated and stored as a secret). All the other stuff is pretty self explaining.
Final thoughts
This article is again not stating that the other ways you find on the internet are not working. It’s just worth noting that approaches like this make your environment more controllable by you and bring a better governance by simple doing things explicit and controlled.