Preface
IronPdf is a HTML-to-PDF converter based on Chromium and fully integrated in .NET Core. It runs on Non-Windows-environments. IronPdf is NOT free. It starts at §399 for a single developer.
Links
Iron Software IronPdf main page GitHub site of Iron Software Source code for this article
The sample
I decided to use a pretty common scenario in order to test some pretty complex techniques when it comes to printing (what PDF generating basically is). So I came up with an invoice which in the end looks like this:
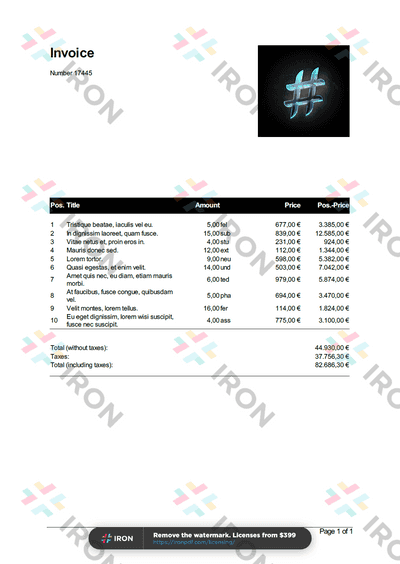
The watermarks and the bottom hint are shown because I didn’t purchase the tool yet and I didn’t start it in a debugging session (if you debug you’ll only get the bottom hint). It will cost $399 for a single developer and a little bit more for a complete team. This is ok for me and my company because we need a soltution for our customer projects.
Basic facts
IronPdf is a library which needs no local installation. Most commonly you will include it into your .NET Core project using NuGet:
install-package IronPdfIronPdf is built around HTML. It comes with an own Chromium runtime which it uses to generate PDF out of HTML. At first I was pretty sceptical about this because certain issues like page breaks and so on are pretty bad handled by HTML converters.
At first - by the way - I was pretty confused because of the corporate identity of IronPdf which still remindes me on another tool: ReSharper. The colors and the logo layout are pretty similar. To clear this out it does not seem that Iron Software and JetBrains have anything in common.
The first thing you recognize (at least if your WAN connection is sometimes as slow as mine) is that IronPdf is pretty heavy. The NuGet package is currently about 17 MB in size and takes a while to install. So be patient!
First touch
IronPdf’s main type is HtmlToPdf. It implements IDisposable which seemed to be overseen even by Iron Software themselves because none of their samples I’ve seen is calling Dispose. However receiving a first result is easy as this (use a Console Application if you will in order to perform tests as simple as possible):
using (var renderer = new HtmlToPdf())
{
    var pdf = await renderer.RenderHtmlAsPdfAsync("<h1>Heading</h1><p>Hello</p>");
    pdf.SaveAs("Result.pdf");
}
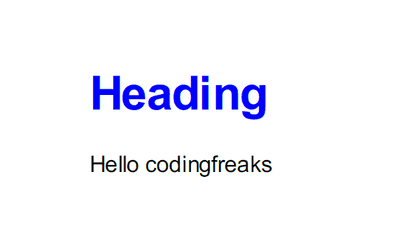
The result when debugging will look like this:
This sample shows how simple it is to achieve first results. Another option now would be to move the definition of the HTML into a single file.
To stick with the simplicity let’s just move the HTML for now:
<html>
    <head>
    </head>
    <body>
        <h1>Heading</h1>
        <p>Hello</p>
    </body>
</html>
and store it as Sample.html in the project dir marking it in the *.csproj for copying out to the bin-folder:
<ItemGroup>
    <None Update="Sample.html">
      <CopyToOutputDirectory>PreserveNewest</CopyToOutputDirectory>
    </None>
</ItemGroup>
Now let’s change our soure code accordingly:
using (var renderer = new HtmlToPdf())
{
    var html = await File.ReadAllTextAsync("Sample.html");
    var baseUri = new Uri(AppDomain.CurrentDomain.BaseDirectory);
    var pdf = await renderer.RenderHtmlAsPdfAsync(html, baseUri);
    pdf.SaveAs("Result.pdf");
}
The result should be the same as shown in Image 2 now but we separated the definition of the “report” from our source code. Another thing to point out in Listing 5 is the usage of a the BaseUrl parameter of RenderAHtmlAsPdfAsync. It tells IronPdf where it should search for dependencies of the HTML file. Currently there are none but we will change this now by introducing some styling using CSS.
So let’s create a Sample.css and treat it like we did with Sample.html in Listing 4:
* {
    font-family: Arial, Helvetica, sans-serif;
}

h1 {
    color: blue;
}
and now change our Sample.html accordingly:
<html>
    <head>
        <link rel="stylesheet" href="Stylesheet.css" />
    </head>
    <body>
        <h1>Heading</h1>
        <p>Hello</p>
    </body>
</html>
The output will be presented as this:
Advancing forward
To this point it is already obvious how we can separate the design of our reports from the technical generation. I like this plus it is pretty good when it comes to “debugging” our report design. One could simple use HTML and CSS to develop the report and the throw it over to IronPdf.
But what about dynamic content? Normally we don’t want to render static HTML. Instead it would be nice to have a conveniant way to pass data from our app to the report.
As Iron Software states out in their tutorials the best way of injecting data is using a technology called Handlebars. Before I explain this in more depth lets use it in our HTML:
<html>
    <head>
        <link rel="stylesheet" href="Stylesheet.css" />
    </head>
    <body>
        <h1>Heading</h1>
        <p>Hello {{Name}}</p>
    </body>
</html>
As you can see I only added a variable Name enclosed by double-curly-braces (the handle bars). Now we need to introduce another NuGet package in order to inject the variable value conviently:
install-package HandleBars.NETThis package brings in some useful stuff to parse text including handle bars and inject values. In our simple scenario the code will change to something like this:
var html = await File.ReadAllTextAsync("Sample.html");
var model = new { Name = "codingfreaks" };
var handleBars = Handlebars.Compile(html);
var parsed = handleBars(model);
using (var renderer = new HtmlToPdf())
{
    var baseUri = new Uri(AppDomain.CurrentDomain.BaseDirectory);
    var pdf = await renderer.RenderHtmlAsPdfAsync(parsed, baseUri);
    pdf.SaveAs(_targetFilePath);
}
The result is this:
So what Listing 10 does is:
- Line 1: Get the HTML including the handle bars placeholders.
- Line 2: Generate any type of C#-class as a model.
- Line 3: Let
HandleBars.NET“understand” the HTML from line 1 and detect all handle bars. - Line 4: Use the C# model and apply it to the template. By default the property
Namefrom the model is matched with the handle bar{{Name}}.
The remaining code just does the IronPdf logic using the parsed result from HandleBars.NET.
Pretty simple and straightforward. But it’s getting even better when you have more complex objects. Lets assume that we change the model to:
var model = new
{
    Meta = new
    {
        Name = "codingfreaks",
        Date = DateTime.Now
    }
};
In order to access nested properties we can adjust the HTML template like this:
<html>
    <head>
        <link rel="stylesheet" href="Sample.css" />
    </head>
    <body>
        <h1>Heading</h1>
        <p>Hello {{Meta.Name}}</p>
        <p>The data was generated at {{Meta.Date}}</p>
    </body>
</html>
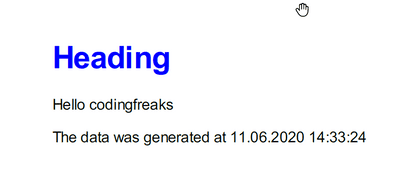
Running this leads to
But wait, I can do even better. What if we think more modularized and extract the complete Meta-part in a single file:
<html>
    <head>
        <link rel="stylesheet" href="Sample.css" />
    </head>
    <body>
        <h1>Heading</h1>
        {{> meta}}
    </body>
</html>
Then this will be the content of a new Meta.html (remember to set it up in csproj!):
<p>Hello {{Meta.Name}}</p>
<p>The data was generated at {{Meta.Date}}</p>
The last thing is to use this in our program:
var html = await File.ReadAllTextAsync("Sample.html");
var metaPartial = await File.ReadAllTextAsync("Meta.html");
var model = new
{
    Meta = new
    {
        Name = "codingfreaks",
        Date = DateTime.Now
    }
};
Handlebars.RegisterTemplate("meta", metaPartial);
var handleBars = Handlebars.Compile(html);
var parsed = handleBars(model);
using (var renderer = new HtmlToPdf())
{
    var baseUri = new Uri(AppDomain.CurrentDomain.BaseDirectory);
    var pdf = await renderer.RenderHtmlAsPdfAsync(parsed, baseUri);
    pdf.SaveAs(_targetFilePath);
}
The result is the same as in Image 5 but now we are structuring the complete thing in a more component-oriented way.
Generating the invoice
Now that we now about all this stuff, we can implement our sample shown in Image 1 at the top. First here are the files needed (which i placed in a separate template-folder):
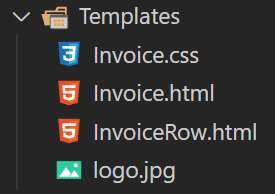
Lets first look at the Invoice.html:
<!DOCTYPE html>
<html>
    <head>
        <meta charset="utf-8" />
        <link rel="stylesheet" href="Invoice.css" />
    </head>
    <body>
        <div class="header">
            <div class="header-text">
                <h1>Invoice</h1>
                <p>Number {{Number}}</p>
            </div>
            <div class="logo"></div>
        </div>
        <table class="positions">
            <colgroup>
                <col style="width: 40px" />
                <col />
                <col style="width: 100px" />
                <col style="width: 80px" />
                <col style="width: 120px" />
                <col style="width: 120px" />
            </colgroup>
            <thead>
                <tr>
                    <th>Pos.</th>
                    <th>Title</th>
                    <th class="right">Amount</th>
                    <th></th>
                    <th class="right">Price</th>
                    <th class="right">Pos.-Price</th>
                </tr>
            </thead>
            <tbody>
                {{#Positions}}
                {{> positionRow}}
                {{/Positions}}
            </tbody>
            <tfoot>
                <tr>
                    <td colspan="5">Total (without taxes):</td>
                    <td class="right">{{PriceWithoutTaxesFormatted}}</td>
                </tr>
                <tr>
                    <td colspan="5">Taxes:</td>
                    <td class="right">{{TaxesFormatted}}</td>
                </tr>
                <tr>
                    <td colspan="5">Total (including taxes):</td>
                    <td class="right">{{PriceIncludingTaxesFormatted}}</td>
                </tr>
            </tfoot>
        </table>
    </body>
</html>
There is nothing fancy for us now. It’s just building the structure of the invoice using a table and a little bit of head-information. The table-body is handle-bared. Here is the InvoiceRow.html defining the HTML of one single table row:
<tr>
    <td>{{OrderNumber}}</td>
    <td>{{Title}}</td>
    <td class="right">{{QuantityFormatted}}</td>
    <td>{{Unit}}</td>
    <td class="right">{{UnitPriceFormatted}}</td>
    <td class="right">{{PriceFormatted}}</td>
</tr>
The last thing on HTML-level is the Invoice.css:
* { font-family: Arial, Helvetica, sans-serif }

body { }

table.positions {
    border-collapse: collapse;
    page-break-inside: auto;
    width: 100%;
}

table.positions tr {
    page-break-after: auto;
    page-break-inside: avoid;
}

table.positions > thead {
    background-color: black;
    color: white;
    display: table-header-group;
    text-align: left;
}

table.positions th {
    height: 1cm;
    vertical-align: middle;
}

table.positions > tbody > tr:first-child > td {
    padding-top: .5cm;
}

table.positions > tbody > td {
    vertical-align: top;
}

table.positions > tfoot { display: table-footer-group }

table.positions > tfoot > tr:first-child > td {
    border-top: 1px solid black;
    padding-top: 1cm;
}

table.positions > tfoot > tr:last-child > td {
    border-bottom: 1px solid black;
    border-bottom-style: double;
    padding-bottom: .5cm;
}

.right { text-align: right; }

.header { min-height: 10cm; }

.header:after { clear: both; }

.header-text { float: left }

.logo {
    background: url('logo.jpg') 50% 50% no-repeat;
    background-size: contain;
    float: right;
    height: 6cm;
    width: 6cm;
}
Very important here are 3 things:
- I’m using metric measurement units to style my HTML.
table.positions tris taking care of having no page-break inside a table row but allowing it to have a page break after each row.- The
theadis styled to behave like a CSStable-header-groupwhich forces it to be redrawn on every page if needed.
Now lets take a look at the C# code for the generation. First here are the 2 models involved:
public class InvoicePosition
{
    public int OrderNumber { get; set; }

    public double Price => Quantity * UnitPrice;

    public string PriceFormatted => Price.ToString("C");

    public double Quantity { get; set; }

    public string QuantityFormatted => Quantity.ToString("#.00");

    public string Title { get; set; }

    public string Unit { get; set; }

    public double UnitPrice { get; set; }

    public string UnitPriceFormatted => UnitPrice.ToString("C");
}public class Invoice
{
public DateTimeOffset InvoiceDate { get; set; }
public string Number { get; set; }
public IEnumerable<InvoicePosition> Positions { get; set; }
public double PriceIncludingTaxes => PriceWithoutTaxes + Taxes;
public string PriceIncludingTaxesFormatted => PriceIncludingTaxes.ToString("C");
public double PriceWithoutTaxes => Positions?.Sum(p => p.Price) ?? 0;
public string PriceWithoutTaxesFormatted => PriceWithoutTaxes.ToString("C");
public double Taxes => PriceWithoutTaxes / 1.19;
public string TaxesFormatted => Taxes.ToString("C");
}I’m not only performing some calculations here but I also take care of providing properties in order to format certain information correctly.
The last thing to mention is the rendering logic:
private static string _targetFilePath;

static async Task Main(string[] args)
{
    _targetFilePath = Path.Combine(AppDomain.CurrentDomain.BaseDirectory, "Result.pdf");
    await TestInvoiceAsync();
    // open the preview (only Windows)
    var previewProcess = new Process
    {
        StartInfo =
        {
            FileName = "explorer",
            Arguments = $@"""{_targetFilePath}"""
        }
    };
    previewProcess.Start();
    Console.WriteLine("PDF generated.");
}

private static async Task TestInvoiceAsync()
{
    // generate invoice data
    var invoice = InvoiceHelper.GenerateRandomInvoice(10);
    // load templates
    var pageTemplate = await File.ReadAllTextAsync("Templates/Invoice.html");
    var rowTemplate = await File.ReadAllTextAsync("Templates/InvoiceRow.html");
    Handlebars.RegisterTemplate("positionRow", rowTemplate);
    // compile templates
    var template = Handlebars.Compile(pageTemplate);
    var result = template(invoice);
    // render to PDF
    using (var renderer = new HtmlToPdf
    {
        PrintOptions =
        {
            FirstPageNumber = 1,
            Footer = new SimpleHeaderFooter
            {
                DrawDividerLine = true,
                RightText = "Page {page} of {total-pages}"
            }
        }
    })
    {
        var baseUri = new Uri(Path.Combine(AppDomain.CurrentDomain.BaseDirectory, "Templates"));
        var pdf = await renderer.RenderHtmlAsPdfAsync(result, baseUri);
        pdf.SaveAs(_targetFilePath);
    }
}
So basically TestInvoiceAsync generates and stores the PDF and the main method opens it for conveniance reasons. I’m also showing the addition of a footer including page numbering and all the stuff we’ve seen in the simple sample.
Limitations
I’m not using IronPdf for so long now. So the following list of limitations is not complete propably. Also it is important to notice that I’m comparing against other reporting-tools I know (Crystal Reports, List & Label) which is not very fair because they are completely different tools. I just want to share with you my thoughts.
- In my tests using adavanced CSS technologies like Flexbox was not working so well.
- You have no real control over special elements like page footers and headers. You can style them using HTML (explained in the docs) but you cannot for instance control the rendering which is pretty often required. There is an option to print a cover page but this does not replace the options needed to control page rendering.
- As far as I’ve seen it you can control the paper size and orientation but you cannot switch them during the printing process (having mixed orientations for example).
- I could not find any buildin preview mechanism.
- There are no options for grouping and rollwing sums and stuff like that.
Summary
I like the approach and the fact that no installation and drivers are needed. This is a pretty important tool in many of our projects and we will use it from now on.


