Summary
Recently I stumbled upon a problem with the file system on Windows. The story started when I wanted to perform a simple
ssh -i ./id_rsa user@10.0.0.1
@@@@@@@@@@@@@@@@@@@@@@@@@@@@@@@@@@@@@@@@@@@@@@@@@@@@@@@@@@@
@         WARNING: UNPROTECTED PRIVATE KEY FILE!          @
@@@@@@@@@@@@@@@@@@@@@@@@@@@@@@@@@@@@@@@@@@@@@@@@@@@@@@@@@@@
Permissions for '.\\id_rsa' are too open.
It is required that your private key files are NOT accessible by others.
This private key will be ignored.
Load key ".\\id_rsa": bad permissions
user@10.0.0.1: Permission denied (publickey).
After some googling I found out that this can be solved pretty easy on Linux:
sudo chmod 400 ./id_rsaAnother story is Windows here. A lot of sources on the web will tell you that you need to start a click-party in Windows Explorer.
This article is intended to give you a more easy solution.
Windows Click journey
Let me first show you how you would deal with this scenario normally. So after you created the file with ssh-keygen you would follow this agenda:
Note All my screenshots are made on a German Windows so you need to stick to the button positions.
-
Open Windows Explorer and navigate to your folder.
-
Right click the file and select “Properties”.
-
Switch to the “Security” tab.
-
Click on “Advanced”-button:
-
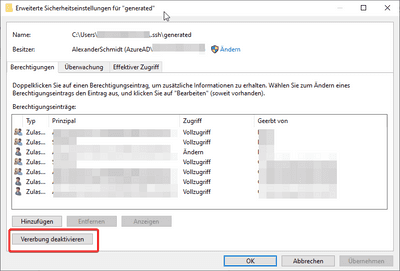
Click on the button which lets you stop the inheritance of privileges for the file (You’ll see later why this could be important):
-
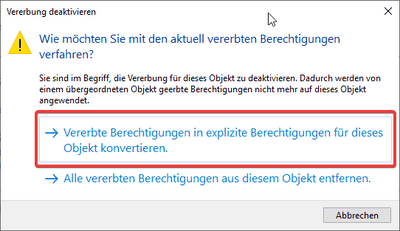
Select the option to keep the inherited permissions and apply them directly to the file:
-
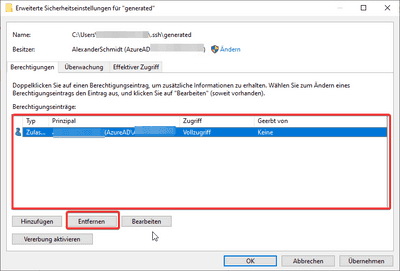
Delete all permissions but the one which matches your current users name:
-
Hit “OK”.
The is bad obviously. But you now might want to know why I have not omitted steps 6 and 7 by simply not applying the inherited permissions. This is only interesting for folks like me who are using an Azure-connected user.
Side-Story AzureAD and Windows
As you can see in the screenshot my user principal name starts with an “AzureAD”. Why is this and how comes?
This local user is a convenient method to achieve something like Single-Sign-On for Azure und M365 resources. As soon as you’ve logged on to your computer secured by password or Windows Hello or whatever, this also generates and updates a token for your Azure environment. This way you don’t have to authenticate yourself over and over again when you for instance browse the portals.
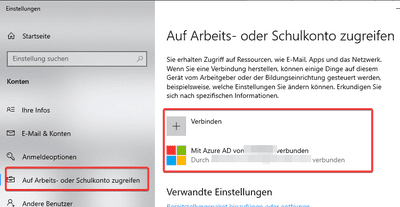
To achieve this you can switch the integration on in your personal account settings in Windows. Hit Win + x and type account into the search box. Then select “Manage account” or whatever it is in your language:
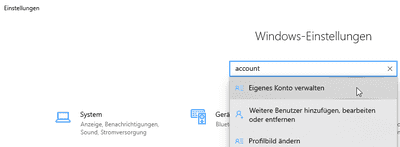
This will bring you to another pane where you click on “Work- or School Account”:
If you click on the +-Button it will require your AAD credentials and afterwards your Account is connected with your PC.
THis all depends on your local rights and your company settings in the cloud. However you get the idea.
The problem now is that this generates a user which is not a regular on your machine. The user will be named “AzureAD\FirstnameLastname” by default. If you go to your computer management and look for this user you won’t find it.
This means that if you choose not to inherit the file rights in Step 6 of our list above you won’t be able to add your actual user to the list and you are stuck there basically.
Solution
OK, lets come out of this rabbit hole and talk about a better solution. Look at this script:
function Clear-FilePermissions($File) {
    if (!$File -or !(Test-Path -Path $File)) {
        Write-Error 'No file provided or file does not exist.' -ErrorAction Stop
    }
    $acl = Get-Acl $File
	$acl.SetAccessRuleProtection($true,$false)
	$currentUser = whoami
	$accessRule = New-Object System.Security.AccessControl.FileSystemAccessRule($currentUser,"FullControl","Allow")
	$acl.SetAccessRule($accessRule)
	$acl | Set-Acl $File
}
If you want to have this in place in every PowerShell session just add this code to the file ~/Documents\PowerShell\Microsoft.PowerShell_profile.ps1. After you saved this file and start a new PowerShell Session your should be able to call Clear-FilePermissions YOUR_FILE_PATH.
The thing is quite simple. It reads out the current permissions (called Access Control List aka Acl) in Line 5. Then it turns off the inheritance (Line 6) and retrieves your current user name and adds full access for this user to the ACL (Lines 7 and 8). Lines 9 and 10 are simply there to apply and write the new permissions. And thats it!
If you want check this using the UI-based approach at the top.
I hope this helps more silly people who like me want to stick to Windows as there OS 😎.


